
Le guide expert pour des axolotls en pleine santé
Make a green wall
Our axolotl tanks require a water-free area of 15 to 20 cm for these jumping kitties, I told myself that it would be nice to use this empty space, at least on the glass part of the back.
So first you need to buy plastic mesh, which can be found cut to size at most DIY stores. The one I found is 1 meter wide. It's up to you to measure what you need.
Then you make your cuts:

Nathalie C

Nathalie C
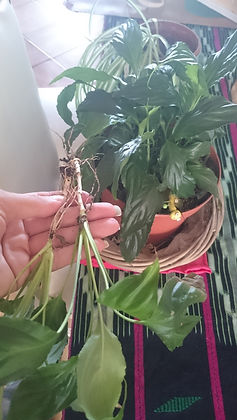
then you cut small iron wires with the cutting pliers to make your hooks which will fix your netting on the tray. If you prefer, use silicone. Then you will be able to start "planting" finally rather to tie your plants (of which you will have rinsed the roots well if they were in the ground) but be sure to let the roots bathe in water! Do not over tighten with your wire to avoid breaking the rods. I used a thinner, more flexible wire to tie my plants to the fence.

Nathalie C

Nathalie C

Nathalie C
Here are the names of most of the plants I have used for my living wall: Kentia de Foster, Pothos, Misère, Alocasia, Calathea, Areca, Asplenium and Papyrus. In the paludarium section you have a listing of the plants you can use. Consider varying the colors with very light greens and reds.
(I also used small squares of this wire mesh to fix mosses of different species for my nano shrimp aquariums)
Another tip: plant your plants in small plastic baskets or pots with lots of holes, and fill with clay balls.
Possibility also to use a horticultural felt.


Nathalie C
Nathalie C

Nathalie C
Here are the plants that I used on my two aquariums (now in place for several years):
Spathiphyllum
chlorophytum
papyrus
misery
Chamaedorea elegans
red vine
Remember to rinse your roots well to get rid of their soil, clay.
In addition to this, you will need to know more about it.
In addition to this, you will need to know more about it.
Fabriquer une jolie jardinière murale
Pour commencer nous avons collé deux panneaux de lambris pvc ensemble puis collé les profils de finition sur les côtés.
Ensuite percer les trous (diamètre plus gros que pour les chevilles pour qu'elles passent dedans) pour les supports de gouttières.
Coller du Scotch double face sur l'arrière autour et au milieu.
Le coller au bon endroit sur le mur
Percer le mur pour les supports de gouttières à la taille adaptée pour les chevilles (attention pas de chevilles mollys avec le lambris pvc).
Fixer les supports de gouttières.
Les fermer en collant le "fermoir"(je ne sais plus comment ça s'appelle) au silicone colle, spécial contact avec de l'eau.
Y clipser les gouttières.
Faire ses plantations.


J'ai posé des gouttières sur du lambris pvc pour protéger le mur des éventuelles éclaboussures et le tout est fixé avec 16 chevilles dans le mur en placo. Le tout n'est pas très lourd, (pour couper les gouttières : scie à métaux).
Concernant les plantes utilisées par Flazzy Boyet : il y a des chlorophytum classiques (vertes et blanches), des chlorophytum vertes, pour les fougères il y a des nephrolepis et des adiantum.
A la fin du mois je leur met une lampe de croissance en plus car elles sont bien sûr sur le mur et donc pas exposés à la lumière du jour.
Voici les liens :
http://www.leroymerlin.fr/v3/p/produits/gouttiere-demi-ronde-pvc-girpi-dev-25-cm-grise-l-2-m-e99572
http://www.leroymerlin.fr/v3/p/produits/support-pour-gouttiere-dev-25-gris-pvc-e160285
Merci à Flazzy Boyet pour cette astuce et ses photos :)